I have only recently got into contact with Windows Communication Foundation (WCF). As a newbie, one of the things I struggled with at first was securing a WCF service with self-signed certificates. Never having used certificates and not knowing how it actually works, it was challenging task to say the least. Looking back now it makes me feel a little silly …
For this post we will use a common business-2-business scenario. We will create a transport-secured (HTTPS) WCF service with certificate client-credential authentication.
1. Create the solution setup:
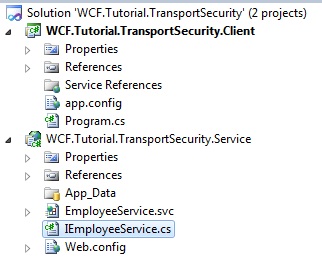
For this scenario, we will build a solution called “WCF.Tutorial.TransportSecurity”
There are 2 projects in this solution: (both are default template projects)
- WCF Service Application called “WCF.Tutorial.TransportSecurity.Service”
- Client console application called “WCF.Tutorial.TransportSecurity.Client”
The service contract looks as following:
2. Configuration of the Service
1. Add the EmployeeService service configuration:
2. Add the EmployeeService binding configuration
On the transport node we set clientCredentialType to “Certificate” .
IMPORTANT: Notice that the Employee service endpoint configuration has bindingConfiguration set to “EmployeeBindingConfig”. This bindingname matches the binding we just configured in the image above. This means the service endpoint will use the basicHttpBinding configuration we defined above.
3. Add the EmployeeService behavior configuration
3. IIS configuration for the service and Transport security certificate configuration
http://localhost/WCF.Tutorial.TransportSecurity.Service/EmployeeService.svc
When you visit our service by web browser, you will most likely get the following error:
4. Creation and configuration of the HTTPS self-signed certificate
We will execute following command:
makecert –pe –n “CN=localhost” –sr localmachine –ss my –sky exchange
IMPORTANT: If you copy it from this blog post, it might fail and say too many parameters are used. Try to write it manually and execute it then. The quotes are being changed by this blog post.
After executing the command, it should say “Succeeded” at the command line.
What does it mean in a nutshell: Create a self-signed certificate for exchange purposes (https) in the localmachine store with the name “localhost”.
Since our domain is “localhost”, we create a certificate with “CN=localhost”. If your domain would be “www.dummiesforlife.com”, your certificate would be created with “CN=www.dummiesforlife.com”.
Self-signed certificates are good for development purposes. Once you want to go to production environment, please get verified certificates from certificate vendors like VeriSign.
There are a lot more options available for “makecert”. You can find more on the msdn documentation: http://msdn.microsoft.com/en-us/library/bfsktky3(v=VS.100).aspx
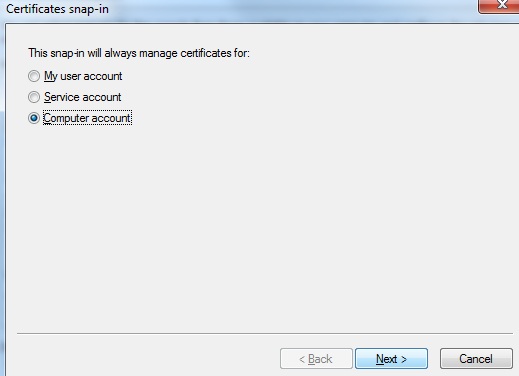
We created the certificate which we will use for the HTTPS transport security, so let’s see if the certificate was created. At run enter “mmc” and press enter.
Go to File – Add/Remove Snap-in … and you should be at the following screen:
At the Local computer certificates in the Personal Store (=My), in the certificates folder you should see a certificate called “localhost”, which is the certificate we created by command line for the https security.
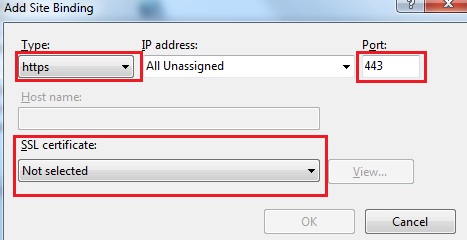
Select the localhost certificate in the SSL certificate list and press OK to add the binding
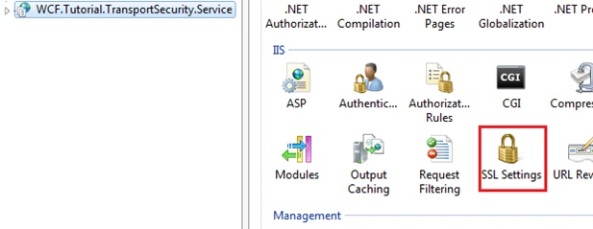
Let’s set the correct SSL settings in IIS for our “WCF.Tutorial.TransportSecurity.Service”, which should match our configuration of our service.
http://localhost/WCF.Tutorial.TransportSecurity.Service/EmployeeService.svc
Well this is an error we like. To access the service, we need to have a client certificate to authenticate ourselves, and the client certificates has to be recognised and trusted by the web server.
What has to be done for our Client Console Application:
- Create a proxy that can consume the secured WCF Service
- Have the correct configuration for our proxy and service endpoint
- Create a client certificate that our proxy can send to authenticate to the WCF service
- Make sure our web server, which hosts our WCF Service, recognizes the client certificate and trusts it, so access is granted
With other words, we are close to have a running solution. Our WCF Service is configured correctly and is hosted within IIS now.
But before we can finish our client application, we should look a little deeper into certificates, what they are and what they are used for.
5. Certificates, what are they and what are they used for
- Assures the identity of the provider
- A point-to-point encryption between the service and the client
Actually I found a great and easy YouTube video which explains the basics of SSL certificates in human words and only in 3 mins. I suggest you watch the video first:
http://www.youtube.com/watch?v=zPqtx1J6udc&feature=youtu.be
There’s a few important things to notice here.
- A certificate contains a public and a private key
- The browser ensures that the certificates is unexpired, unrevoked, issued by a trusted party and that its common name matches the website that it is connecting to
- The private key is used to decrypt the symmetric key created by the client, which was encrypted by the certificate’s public key.
When the client requests a secure conversation with the server, the server returns its certificate and its public key. The client generates a symmetric key and encrypts this symmetric key with the certificate’s public key and passes this encrypted symmetric key to the web server. This encrypted symmetric key can only be decrypted by the private key of that certificate, and the private key is never being traded, it always remains on the server. The private key is highly confidential and the web server is the only one having the private key. As the symmetric key encrypted with the exchanged public key is only decryptable with the private key, the server is the only instance able to decrypt this encrypted symmetric key and get the same symmetric key as the client has. If someone would have been sniffing the handshake, he would only get an symmetric key, which he can not decrypt because he does not have the private key … As only the server can get the symmetric key by decryption, we are setting up a secure channel. Both the client and the server will have an identical symmetric key, which nobody else can have if the private key is safe, and all communication can from this point on be encrypted with the symmetric key, which both sides have and which people with bad intentions do not have.
As mentioned above, one of the issues which might arise when using transport security, is that the web server does not have enough rights on the private key. At some point, the web server will get an encrypted symmetric key which it has to decrypt with its private key. If the web server does not have enough rights to this private key, it will fail to decrypt the encrypted symmetric key and the handshake will fail, resulting in an error.
If this issue would occur, you can solve this by managing the Private keys of your certificate that you use for the transport security as following:

If your application pool under which your IIS application runs is for example “Network Service”, then you would have to add Network Service to the users that have access to this private key and make sure it has read rights to the private key, so that it can retrieve the key from the local machine to decrypt the encrypted symmetric key.
As also mentioned in the things to notice, the common name of the certificate has to match the domain name of the website it is connecting to. In our case our domain is localhost as we are running it in IIS locally. If our website would be hosted on a domain http://www.website.com, our certificate subject would be “www.website.com”.
There are 2 ways to get a certificate. One is creating a self-signed certificate and the second is to buy a certificate which is issued by a trusted certificate authority, like VeriSign.
Self-signed certificates are only good for development purposes. Thus once you want to go into production with your application, you will need to get a certificate from a verified certificate authority. These authorities will issue the certificate for you and the subject of the certificate will be your website domain name. This way the certificate will also guarantee the identity of the website to the client by the SSL certificate, as these authorities will not issue multiple certificates for one and the same domain.
These certificates are issued by authorities, like VeriSign, Thawte, GoDaddy and a few others. These are “recognized” certificate authorities. If you want to have a valid certificate which can be trusted by clients, your certificate will have to come from one of these recognized certificate authorities. These recognized certificate authorities is what we call a “trusted root certification authority“, a global trusted authority that issues SSL certificates for secure communication.
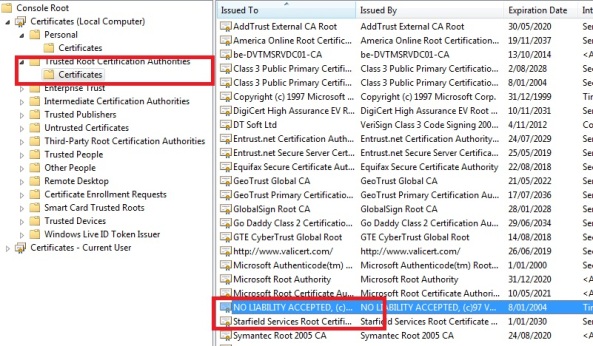
You can find these trusted root certification authorities in your certificates MMC:
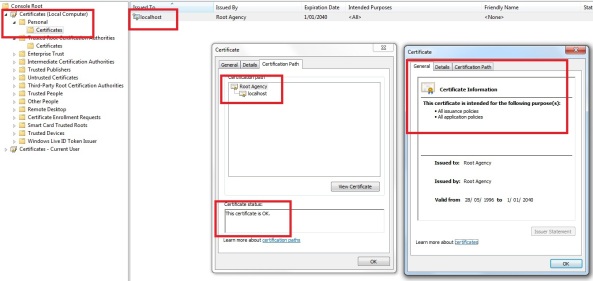
If we now look at our self-signed certificate called “localhost”, which we created in one of the previous steps.
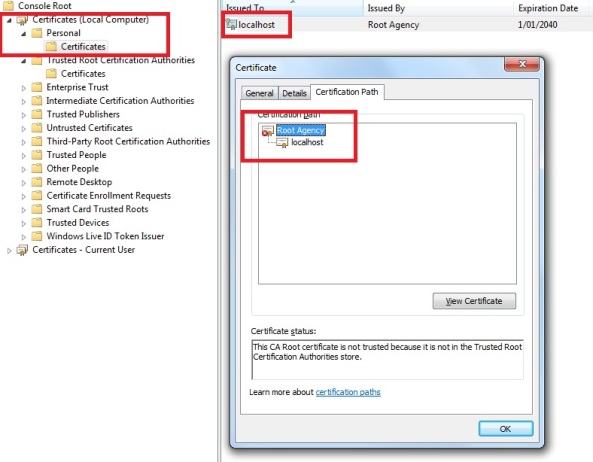
Go to personal certificates on your local computer certificates, and double-click the localhost certificate, which we use for our Transport security of our WCF service
In the image above you can see our certificate image has a red cross added to it and there is a notification “This certificate cannot be verified up to a trusted certification authority”. It also says it is Issued by “Root Agency”. Root Agency is the default Root authority your self-signed certificate belongs to, if you have not created your own self-signed root authority certificate, which we have not.
So this actually means when the client tries to set up a transport secured channel with our service, it will most likely get an exception because the SSL certificate used by the server is not verified by an instance that is at the “Trusted root certification authorities”!
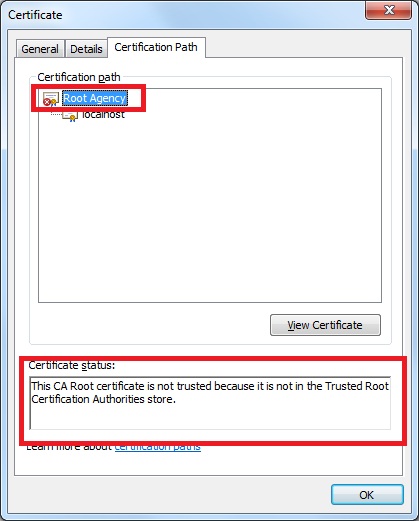
If you look at the Certification path of the localhost certificate properties, you will see that the “Root Agency” certificate shown the following error:
“This CA Root certificate is not trusted because it is not in the Trusted Root Certification Authorities store”.
It says the root authority of our self-signed certificate is not present in the Trusted Root Certification Authorities.
Our default Root Authority is called “Root Agency” with our self-signed certificate.
If we looked in our Trusted Root Certification Authorities in our local computer, we see there is NO “Root Agency” certificate installed, which means our “localhost” certificate will not be trusted if we have a client on this computer trying to set up a secure transport channel with your service.
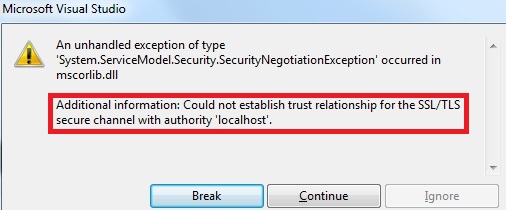
If we could have a client proxy and we try to consume the service (and pass a valid client authentication certificate), we would get the following error:
It will say “Could not establish trust relationship for the SSL/TLS secure channel with authority ‘localhost'” because the root authority that localhost has is not installed on the Trusted root certification authorities on the machine the client is on (In our case this is the same machine as the service).
To be working with self-signed certificates, it is useful to have a self-signed root authority which issued the self-signed SSL certificate. There are 2 ways:
- First create a self-signed root authority and install it in the “Trusted root certification authorities”. Secondly create a self-signed SSL certificate (like localhost) but with the private key of that root authority your created. This way the self-signed SSL certificate will be linked to a trusted root certification authority, which you also self-signed.
- Do it the same way as we did with our self-signed certificate. Create first your self-signed certificate and afterwards make sure the default “Root Agency” certificate is installed in your Trusted root certification authorities.
Since we first created the SSL certificate, let’s go with the second method and make sure our “Root Agency” is a valid Trusted root certification authority.
If you want to create your own Root CA certificate and Root CRL certificate, you can find how to on this post at section 8.What if you insist on creating your own ROOT CA certificate and ROOT certificate revocation list (CRL)
WCF Message Security and client certificate authentication with self-signed certificates
Go to the personal certificates of your local computer, where our SSL localhost certificate is, double hit the localhost certificate and go to the Certification Path of the certificate properties:
Double click the “Root Agency” in the Certification path, which will open the Root Agency certificate:
Note how it says “This CA root certificate is not trusted. To enable trust, install this certificate in the Trusted Root Certification Authorities store”. How nice, it actually says how we can solve the trust issue
Go to the tab Details and press the button “Copy to file”, which will start a wizard to export the certificate, so that we can import this certificate in the Trusted root certification authorities:
Press next:
Press Next, Select a location on your machine where to store the certificate and call it “Root Agency”, Select Next and Press Finish:
It should say “the export was succesfull”. At the location where you stored the certificate, you should have a .cer extension certificate:
Now we exported this certificate, so we can import it into the Trusted root certification authorities:
Go to the Trusted Root certification authorities, right click the certificates folder, go to all Tasks and press Import:
Press Next on the start of the wizard and on the next window select the certificate we just exported in the steps above, so we can import it now:
Press Next:
Notice that the certificate store in which we import this certificate is “Trusted Root Certification Authorities” is, the store where all trusted root authorities are that issue trusted certificates.
Press Next and press Finish. The import should succeed. Now you should be able to see the “Root Agency” certificate in the root authorities store:

If you go back to the localhost SSL certificate, which we created ourselves and go the properties of the Certification path, you should see the Root Authority is not valid for our SSL certificate:
There are a few very important things to remember:
- Every certificate has a Root authority. If it is self-signed and it does not have a valid Trusted Root Certification Authority, an exception will be thrown at the client which is trying to consume the service, that it could not establish a trusted TLS/SSL channel, because that Root authority is not present in the trusted root certification authority of the client. Once it is, the trusted TLS/SSL channel will be established.
- If you create or import, like in this tutorial, the root certificate authority in the root authority store of your machine of the service, and your client is on another machine (somewhere over the internet, we don’t know where), your client will not be able to establish a trusted TLS/SSL channel, because the client does not have this Root Authority certificate we created into this trusted root authority store!! Only the recognized certificate authorities, like VeriSign and Tawthe etc are by default in the Trusted Root Certificate Authorities. Your self-signed or imported root authority certificate is not, so it will fail, unless you add some code to the client like this, though this is not advised: ServicePointManager.ServerCertificateValidationCallback = new RemoteCertificateValidationCallback(delegate{return true;});
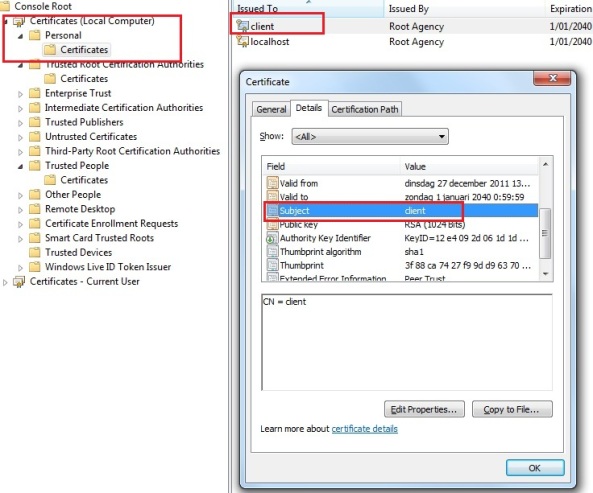
- PeerTrust: the certificate that the client provides to authenticate, should be at the “Trusted People” certificate store.
- ChainTrust: the certificate should be issued by a trusted root certification authority and that authority has to be present at the “Trusted root certification authority” certificate store.
- PeerOrChainTrust: both the above combinations are possible.
6. Consume the WCF Service by the client and authenticate with a client certificate to the service
- System.ServiceModel
- WCF.Tutorial.TransportSecurity.Service (Projects tab at the Add Reference dialog)
We are adding a reference to the service project because our interface for our service is there. We can easily create a proxy to consume the service by ChannelFactory<interface> without much hassle.
In a real scenario, you would put your interface in a separate library, so that you could share the interface only with other businesses, or you would just share the WSDL of the service with other businesses. But since this is a demo, we just add a reference to our service project.
If there is no Application Configuration File present yet, add a new one (app.config).
Now we need to configure the client app.config so that it can communicate with the WCF service hosted on https://localhost/WCF.Tutorial.TransportSecurity.Service/EmployeeService.svc
As always, our configuration comes within . Since we are at the client, and not the service, we need to add a section with an defined of which the address is the absolute uri of the WCF service we created. The binding is a basicHttpBinding, the same binding as our WCF service and the contract is “WCF.Tutorial.TransportSecurity.Service.IEmployeeService” which points to the Interface of our EmployeeService at the Service project. We also set the bindingConfiguration to a basicHttpBinding config, which matches the same binding as the one on the service, defining we use Transport security with clientCredentialType of certificate.
The configuration above should look familiar, as it looks almost the some of the configuration we defined at our Service. The only thing left we need to add at the configuration of our client side, is the client credential certificate, specifying what certificate our client application should use to authenticate to our WCF Service. However before we can do that, we will first need to create a certificate the client can use for authentication.
We create a self-signed client certificate for authentication with the following command (in the visual studio command line prompt again):
makecert -pe -n “CN=client” -sr localmachine -ss my -sky signature
- Signature: Indicates that the key is used for a digital signature
- Exchange: Indicates that the key is used for key encryption and key exchange
The above scenario is almost equal to exporting and importing a certificate as before, so I will not include screenshots. Execute the following steps:
- Go to the Personal store on the local machine certificate store on the Client machine
- Right click the “client” certificate, go to All Tasks and press Export
- Press Next
- Leave it to “No, don’t export the private key” and press Next
- Leave it to “DER encoded binary X.509 (.CER) “ and press Next
- Select a location where you want to store the client certificate and call it “client” and press Next
- Press Finish and the certificate should be created at the location you specified
- Go to the “Trusted People” certificate store on the Server machine where we host the Service (in our case the same machine), right-click, go to All Tasks and hit Import
- Press Next
- Select the client.cer certificate at the location you chose before at the export (or if you traded it with an admin, where-ever the admin placed it after trade) and Press Next
- Press Next, again Next and then press Finish
Now that we created the client certificate for authentication, set it at the right store, we need to configure our client console application so that the endpoint at our <client> uses the certificate to authenticate to the service.
We will add an endpointBehavior (Note this is an endpointbehavior, and not a servicebehaviour as it is on the service side) that specifies the clientCredentials for the client to connect to our EmployeeService. We set the clientCredentials to a clientCertificate (aka authenticate by certificate to the service) and therefore we need to specify 4 values.
- StoreLocation: At what store our client certificate is. In our case this is LocalMachine. You can choose between CurrentUser and LocalMachine
- StoreName: At what store our client certificate is, depending on the storelocation. In our case this is “My”, which means the Personal store
- X509FindType: Defines by what certificate detail you want to search for the certificate. We use FindBySubjectName, which searches the certificate by subject
- FindValue: The value it searches for on the certificate details, depending on what detail we want to search on, which is defined in the X509FindType
We set it to look for a certificate by subject name “client”, which will return our client certificate:
We defined the endpointBehavior, now we need to make sure our endpoint also references to that behavior we created. This is the result:
Now we only need to add some code at our program.cs, that will create a proxy that tries to connect to the WCF service, authenticates to the service by the client certificate, calls the GetEmployee operation and gets a result back. If all this works, we have set up Transport Security with certificate clientcredential:
In code we create a channelFactory<WCF.Tutorial.TransportSecurity.Service.IEmployeeService) with the endpoint “serviceEndpoint”, which is the endpoint name we specified in section of our client configuration and we create the channel for communication. On the next line we call the operation GetEmployee and we pass my name along. The result that is returned we write to the console to see if the communication works.
If we now set our client console application as startup project and we run the client, we get the following:
Considering the following:
We should have gotten as result “Employee information: Robbin Cremers”, which was also the result we gotten. This means the channel was secured with Transport Security and the client has to authenticate by a client certificate, which is trusted by our service’s web server. If you try to create a client which attempts to call this operation without providing the client certificate, access will be denied!
Any suggestions, remarks or improvements are always welcome.
If you found this information useful, make sure to support me by leaving a comment.
Cheers and have fun,
Robbin














You must be logged in to post a comment.